HTTP File Server on TrueNAS - Tutorial
Ever wanted to share some folders from your disk with simple permissions, or even allow editing on some folders, but found NextCloud too complex for your needs? This tutorial will guide you through the installation and configuration of HTTP File Server 3 on TrueNAS Scale trough a Custom App (Docker). Thanks to rejetto for HFS3!
There are plenty of apps in the TrueNAS App Library, unfortunately, HFS3 is not one of them. But don’t worry, we can easily install it by setting up a custom Docker app. We’ll be using open solutions, which means there is no “one good way of doing this”. This is just one of many.
Table of Contents
- Table of Contents
- Prerequisites
- Permissions and ACLs
- Setting up the Custom App
- Make yourself feel at home
- Comments
Edits and corrections: None yet.
Prerequisites
- A working TrueNAS Scale installation
- Knowledge of port forwarding on your router (or reverse proxy configuration)
Permissions and ACLs
We’ll start with setting up some directory permissions, so that this doesn’t trip us up later.
On TrueNas Scale, Apps run under the user apps (id 568). We’ll be granting file system permissions to this user. We’ll be mounting these paths under our Custom App.
Creating a Dataset for HFS
The most robust approach is to create a Dataset for HFS, to store the config files and logs:
- Navigate to your Datasets (
your.server.address/ui/datasets/) - Add a Dataset

- Enter a name, and change the Dataset Preset to
Apps. By doing this, you gave theappsuser Read/Write permissions to this Dataset. Finally, click Save.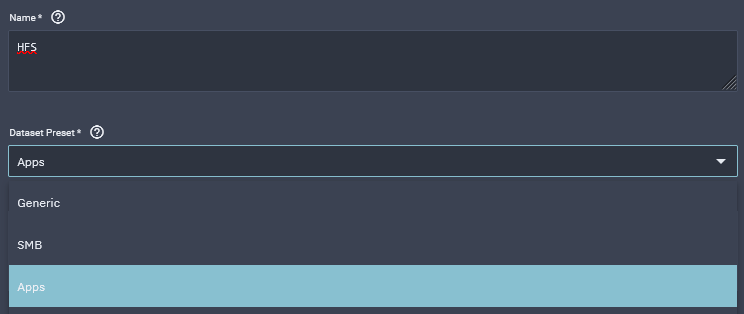
Additional Directories
It’s easiest to put the directories and files you want to share under the Dataset we just created.
You can of course allow HFS to see other parts of your File System. You could mount your whole File System, but I recommend mounting specific Datasets or Directories. Whatever you mount, you’ll need to add the apps user to the ACL of that path. More info on ACLs here.
Setting up the Custom App
- Navigate to the Apps section in the Web UI.
- Click Dicover Apps on the top right
- Click Custom App on the top right again
- I recommend the following configuration options:
- Application Name:
hfs
You can enter any lowecase name. - Version: leave as-is
This is the version of your own Custom App - it doesn’t matter.
Image Configuration - Repository:
rejetto/hfs - Tag:
latest - Pull Policy:
Always pull an image even if it is present on the host.
This will always download the latest stable version of HFS from the Docker Hub. Important: Never update HFS from the Admin Panel of HFS, instead, restart your Custom App and let it download the latest image from Docker Hub.
Container Configuration - Hostname: leave empty
- Entrypoint: leave empty
- Command: leave empty
- Timezone: set yours
- Environment Variables:
Add the following variables:- Name:
HFS_CREATE_ADMIN; Value:password123
This will create a useradminwith the specified password. If you use a simple password here, remember to change it! You can remove this variable after you started the App once. - Advanced: Name:
HFS_PORT; Value: decide yourself
You don’t need to specify this, unless you want HFS to use a different port than 80/443. This will be the port HFS uses inside the container.
- Name:
- Restart Policy:
Unless Stopped
This will make sure your HFS always starts and stays running.
You can leave the rest of Container Configuration empty.
Security Context Configuration
You can leave this section empty. If you want to use another user for HFS instead ofapps, you can create one in the Credentials page and add its User and/or Group IDs here. Remember to set the ACLs accordingly if you do this.
Network Configuration - Host Network: leave OFF
- Ports:
Add new ports with parameters:- HTTP
- Container port:
80
Make sure it’s the same asHFS_PORT, if you defined it. - Host port:
80
This is the port you’ll be able to access HFS from your local network, and from anywhere if you port-forward. For maximum safety, I recommend setting up a simple reverse-proxy like Nginx Proxy Manager (available as a TrueNas App), and letting it handle your HTTPS traffic. In this case, use a high port, like30100, and set up the reverse-proxy for it. I will not cover this usecase here in detail. - Protocol:
TCP
- Container port:
- HTTPS
If you’re not using a reverse-proxy, and you’ll request a certificate through HFS, you need to expose the HTTPS port as well.- Container port:
443 - Host port:
443 - Protocol:
TCP
- Container port:
- HTTP
- Rest of Network Configuration: leave empty.
- Portal Configuration: leave empty.
Storage Configuration - Add a Storage option for your HFS Config Dataset:
- Type:
Host Path - Mount Path (important!):
/.hfs - Enable ACL: leave OFF
- Host Path: select path to the Dataset you created earlier, for example:
/mnt/MY-SERVER/HFS
- Type:
- Add a Storage options for other shared Datasets:
- Type:
Host Path - Mount Path (important!):
/mnt/[folder-name]
You find your folders in the HFS Web Panel in this place, too (under themntfolder in the root of the container’s file system.) - Host Path: path to your Dataset or Directory.
- Type:
- Labels Configuration: leave empty.
Resources Configuration
HFS won’t use much when idle, but be sure to give ample resources to handle big tasks, like zipping or listing many files. You won’t need GPU Passtrough, leave it OFF.
- Application Name:
And that’s about it, click Install!
Make yourself feel at home
After you first started HFS, it will populate /.hfs with its config files.
If you had a previous HFS config: find your config.yaml file, and open it up in a text editor. Replace all source entries in your vfs section according to how you mounted directories just now under /mnt/. Stop the HFS Custom App, and replace the original config.yaml with yours (for example, trough an SMB share).
You can set up a reverse-proxy or even Cloudflare for your server - these will not be covered here today. If you use a proxy, don’t forget to set the Number of HTTP Proxies under Options/Networking on the HFS Admin Panel.
Happy sharing!
Comments
Feel free to ask questions or share your insights here. Keep it civil \;)